If I will build another printer I will choose a more beaten path - Arduino Mega with Ramps and motor drivers.
I shortly realized that there is no bootloader on the Sanguinololu's Atmega1284p, so I bought a $7 USBasp programmer from ebay. I tried to follow the instructions from USBasp programmer for Sanguinololu page, but no success. You can see my setup below (NOTE: Do Not power the Sanguinololu board, the chip will be powered by the programmer)

My patch between the programmer and the Sanguinololu was:
| Function | USBasp Programmer Output | Sanguinololu ISP header |
| MISO | 9 | 1 |
| VCC +5V | 2 | 2 |
| SCK | 7 | 3 |
| MOSI | 1 | 4 |
| RESET | 5 | 5 |
| GDN | 10 | 6 |
After I exhausted all options that I could think about I decided to buy a Arduino Uno to use it as a programmer and use the approach from this Burning the Sanguino Bootloader using Arduino as ISP page, but patching to the Sanguinololu board directly, because I did not have all the electronic components, using the following patch table:
| Function | Arduino UNO Pins | Sanguinololu ISP header |
| MISO | 12 | 1 |
| VCC +5V | 5Vcc | 2 |
| SCK | 13 | 3 |
| MOSI | 11 | 4 |
| RESET | 10 | 5 |
| GDN | GDN | 6 |
And you can see my new setup:
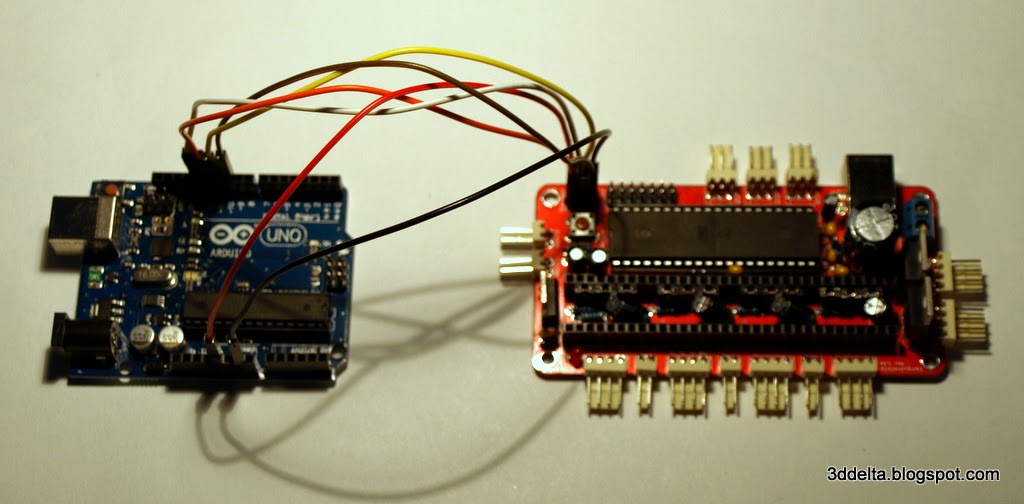
This din not work either.
I decided to go all the way, remove the Atmega chip and program it on a breadboard. When I removed the chip I noticed that the 16MHz ceramic resonator was chipped with the pins bent under the Atmega microcontroller.
I ordered the components on ebay, replaced the ceramic resonator, but still went with the breadboard. I ended up with this setup:
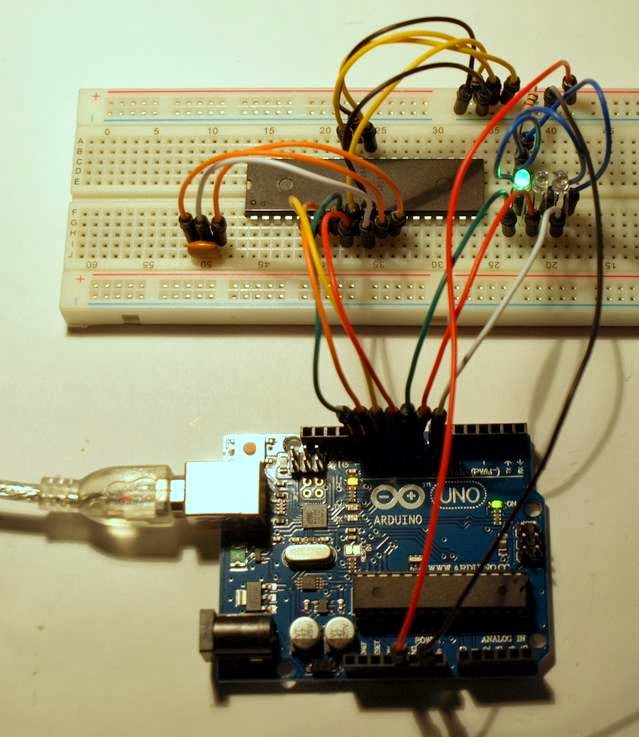
This time it worked and I successfully burned the bootloader from the Marlin firmware on the chip using the burn bootloader option in Arduino IDE. For more details check Steve's blog about building Sanguinololu board.
I learned next that the default fuse settings from the boards.txt file did not match my board case and used this Fuse Calculator to set my values. In my case I used:
- Low Fuse: 0xE6
- High Fuse: 0xDA
- Extended Fuse: 0xFD
To burn the fuse settings with the Arduino as ISP I used:
avrdude -p m1284p -c arduino -P com3 -v -b 19200 -U hfuse:w:0xDA:m -U lfuse:w:0xE6:m -U efuse:w:0xFD:m
In the end I modified the Sanguinololu entry in the boards.txt file to reflect my fuse settings:
atmega1284.name=Sanguinololu W/ ATmega1284p 16mhz
atmega1284.upload.protocol=stk500v1
atmega1284.upload.maximum_size=129024
atmega1284.upload.speed=57600
atmega1284.bootloader.low_fuses=0xE6
atmega1284.bootloader.high_fuses=0xDA
atmega1284.bootloader.extended_fuses=0xFD
atmega1284.bootloader.path=standard
atmega1284.bootloader.file=ATmegaBOOT_1284P.hex
atmega1284.bootloader.unlock_bits=0x3F
atmega1284.bootloader.lock_bits=0x0F
atmega1284.build.mcu=atmega1284p
atmega1284.build.f_cpu=16000000L
atmega1284.build.core=arduino
I used both controlling software (Repetier Host and Printrun with Pronterface) on a windows 7 PC and send manual commands to start moving the motors and finally got movement.
In the next post I will show the assembly of the extruder and attachment of the hot-end, plus wiring all together.
Wow, very detailed process with steps I was able to skip by buying mega2560 and Ramps1.4
ReplyDeleteI used ErikZalm/Marlin firmware.
This has the M666 command for endstop adjustment.